drop-in frames integration
make getting paid faster and easier than ever! paymennt APIs provide an easy way to let your customers pay for their orders easily and securely.
frames is an iframe solution that handles payment information. Your customer inputs their card details directly into our iframes, then we send you a token representing of the card details, so you can request a payment.
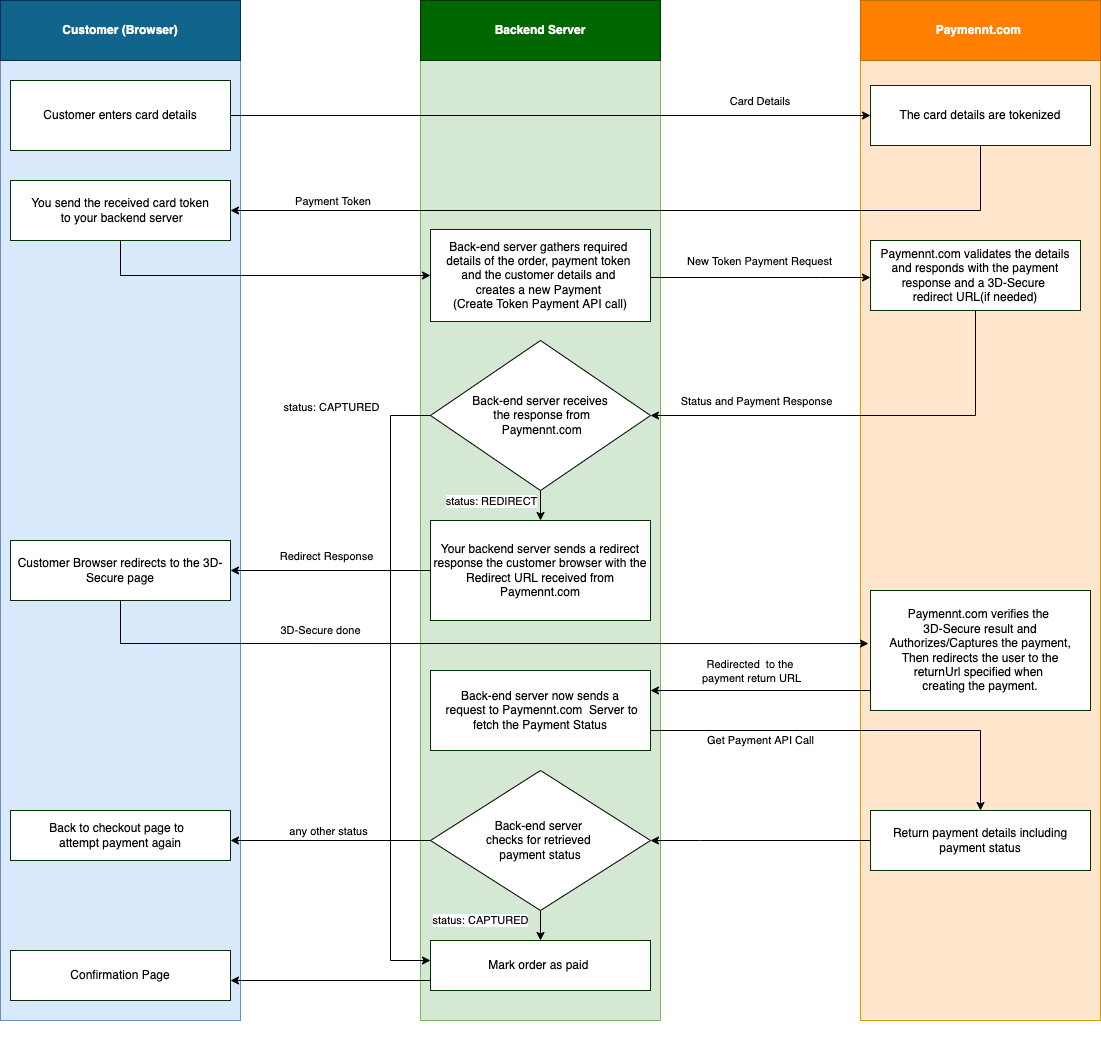
Integration flow
You embed the Frames payment form in your website.
When the customer checkouts, they can enter payment details directly on the checkout page.
We process the customer's sensitive information and return a token representing those details. This process is called tokenization.
Your site backend system gathers the order details and the received payment token in a request to make the Create token payment API call to paymennt and obtains the payment response with status and payment ID. Depending on the status-
CAPTURED: the payment has been successfully processed (without 3D-Secure redirect). You should update your order status on your backend system.
REDIRECT: the payment needs 3D-Secure to be processed, for this the customer should be redirected to the
redirectUrlpresent in the response of Create token payment API call.any other status: they imply that the payment could not be processed. You may ask the customer to checkout again.
For CAPTURED status, you should update order status on your backend system and lead the customer to desired confirmation page.
For REDIRECT status, once the customer has been redirected back to your website, make the Get payment API call using the payment ID received in step 4, to retrieve the status. If status is CAPTURED the payment has succeeded, you should confirm order status on your backend system, for other statuses the payment has failed and you may follow checkout flow again.
For any other status, the customer is finally redirected back to your website using the parameter
returnUrlspecified in the Create token payment API call.
- Make sure to check the Website Checklist before going live.
That's it! You're ready to start testing.
Integration details
- Import PaymenntJS JavaScript file into the payment page
<script src="https://pay.paymennt.com/static/js/paymennt-frames.js"></script>
- In your page JavaScript initialize PaymenntJS with your public key obtained from paymennt,
Sample code :
PaymenntJS.init({
  publicKey: "{PAYMENNT_PUBLIC_KEY}",
  selector: "#paymennt-card-frame"
  mode: PaymenntJS.modes.LIVE,
  onTokenized: function (data) {
    // send data.token to server
  },
  onTokenizationFailed: function (data) {
    // show data.error message
  },
  onValidationUpdate: function (data) {
    if (data.valid) {
      // enable pay button;
    } else {
      // disable pay button;
    }
  },
});
3- In your page, add an empty <div> element and pass its selector to PaymenntJS.init() method
Example:
<div id="paymennt-card-frame" class="card-frame"></div>
Full example
- JavaScript
- Html
- CSS
var payButton = document.getElementById("pay-button");
var errorMessage = document.querySelector(".error-message");
var infoMessage = document.querySelector(".info-message");

payButton.disabled = true;

PaymenntJS.init({
  publicKey: "pk_test_a941633441f48b73b9b9e1822227829a",
  mode: PaymenntJS.modes.TEST,
  onTokenized: function (data) {
    infoMessage.innerText = data.token;
  },
  onTokenizationFailed: function (data) {
    errorMessage.innerText = data.error;
  },

  onValidationUpdate: function (data) {
    payButton.disabled = !data.valid;
    if (!data.valid) {
      var message = null;
      for (var i = 0; i < data.validationErrors.length; ++i) {
        var fieldValidation = data.validationErrors[i];
        if (!message || fieldValidation.field === data.lastActiveField) {
          message = fieldValidation.message;
        }
      }
      if (!message) {
        message = data.error ? data.error : "Invalid card details";
      }
      errorMessage.innerText = message;
    } else {
      errorMessage.innerText = "";
    }
  },
});

payButton.addEventListener("click", function (event) {
  event.preventDefault();
  PaymenntJS.submitPayment();
});
<!DOCTYPE html>
<html lang="en">
  <head>
    <meta charset="utf-8" />
    <meta name="viewport" content="width=device-width, initial-scale=1.0" />
    <title>Paymennt.com Frames</title>
    <link rel="stylesheet" href="style.css" />
  </head>

  <body>
    <div id="paymennt-frame" class="card-frame"></div>
    <p class="info-message"></p>
    <p class="error-message"></p>

    <button id="pay-button" type="submit">Pay</button>

    <script src="https://pay.paymennt.com/static/js/paymennt-frames.js"></script>
    <script src="app.js"></script>
  </body>
</html>
body {
  text-align: center;
}

#paymennt-frame {
  max-width: 370px;
  margin: 0 auto;
}

#pay-button {
  border: none;
  border-radius: 3px;
  color: #fff;
  font-weight: 500;
  height: 40px;
  width: 120px;
  background-color: #13395e;
  box-shadow: 0 1px 3px 0 rgba(19, 57, 94, 0.4);
}

#pay-button:active {
  background-color: #0b2a49;
  box-shadow: 0 1px 3px 0 rgba(19, 57, 94, 0.4);
}

#pay-button:hover {
  background-color: #15406b;
  box-shadow: 0 2px 5px 0 rgba(19, 57, 94, 0.4);
}

#pay-button:disabled {
  background-color: #697887;
  box-shadow: none;
}

#pay-button:not(:disabled) {
  cursor: pointer;
}

.card-frame {
  border: solid 1px #13395e;
  border-radius: 3px;
  width: 100%;
  padding: 5px;
  margin-bottom: 8px;
  height: 100px;
  box-shadow: 0 1px 3px 0 rgba(19, 57, 94, 0.2);
}

.error-message {
  color: red;
  font-weight: 600;
}

.info-message {
  color: green;
  font-weight: 600;
}
Test the Integration
- Go to your website, and add products to your cart.
- Go to your cart then proceed to the checkout, Enter the required customer and billing details ... .
- Select the paymennt.com payment method.
- Enter the following card details:
- Number:
4012 8888 8888 1881(to demonstrate payment without 3D-Secure) - Number:
4242 4242 4242 4242(to demonstrate payment requiring 3D-Secure redirect) - Expiry date:
12/25 - CVV:
100 - Name:
TEST USER
- Number:
- Check the status of the payment on your backend administration panel.